20+ Years Experience
Specialist Oil Tank Installers
Enquire Today For A Free No Obligation Quote
Cleaning the filter on an outside oil tank is an essential maintenance task to ensure the proper functioning of the tank and to prevent potential issues.
Over time, filters can become clogged with dirt, debris, and sediment, affecting the performance of the oil system. It is important to regularly clean the filter to maintain efficient oil flow and prevent blockages.
To clean the filter on an outside oil tank, a few tools and equipment are required, including protective gloves, a filter wrench, a brush, a container for collecting oil, and absorbent material or rags. These items will assist in safely and effectively completing the cleaning process.
In this step-by-step guide, we will walk you through the process of cleaning the filter on an outside oil tank. The steps include preparation, shutting off the oil supply, locating the filter, removing the filter, cleaning the filter, reinstalling the filter, and finally, turning on the oil supply. Each step is crucial in ensuring a thorough and successful cleaning process.
We will provide you with some additional tips and safety precautions to keep in mind while cleaning the filter. Following these guidelines will help prevent accidents, maintain your safety, and prolong the lifespan of your oil tank.
By regularly cleaning the filter on your outside oil tank, you can ensure the efficient and reliable performance of your oil system, minimise the risk of issues or breakdowns, and ultimately extend the life of your tank.
Regularly cleaning the filter on an outside oil tank is important for several reasons. First and foremost, it is crucial to ensure that the flow of oil is not restricted, as a clogged filter can lead to inefficient performance and potential damage to the oil tank system.
By performing regular cleaning, you can guarantee that oil can flow freely, providing consistent heating and preventing any blockages or malfunctions.
Additionally, a dirty filter can result in the accumulation of sediment, debris, and impurities from the oil, which can greatly affect its quality.
These contaminants have the potential to contaminate the oil, resulting in poor combustion and reduced efficiency. Cleaning the filter effectively removes these impurities, ensuring that the oil remains clean and of high quality.
Lastly, cleaning the filter is necessary for maintaining the longevity of the oil tank system. Over time, the accumulation of debris and sediment can cause corrosion and deterioration of the tank. Regular cleaning plays a vital role in preventing this buildup and extending the lifespan of the oil tank.
In 2015, a homeowner experienced the consequences of neglecting to clean the filter on their outside oil tank for several years. As a result, the tank became clogged with debris and sediment, obstructing the flow of oil. This led to inconsistent heating and eventually resulted in a system breakdown.
Consequently, the homeowner had no choice but to replace the entire oil tank, resulting in substantial costs. This incident serves as a poignant reminder of why regular filter cleaning is essential in order to avoid expensive repairs and maintain optimal system performance.
When it comes to cleaning the filter on an outside oil tank, having the right tools and equipment is essential. Here is a list of the tools and equipment required:
– Safety goggles: It is important to wear safety goggles to protect your eyes from any debris or chemicals.
– Gloves: Make sure to wear gloves to keep your hands clean and safe from any chemicals.
– Screwdriver: You will need a screwdriver to unscrew the filter cover.
– Filter wrench: Use a filter wrench to help in removing the old filter and installing a new one.
– Bucket or container: Keep a bucket or container handy to collect any oil or debris that might come out during the cleaning process.
– Clean rags: Have some clean rags ready to wipe down the filter and surrounding areas.
Pro-tip: Before you begin the cleaning process, remember to turn off the power to the oil tank to avoid any accidents. Safety should always be your top priority when working with any equipment.
Get ready to give your outside oil tank the care it deserves with this step-by-step guide to cleaning the filter. From preparation to turning on the oil supply, we’ll walk you through each crucial stage.
Discover how to shut off the oil supply, locate and remove the filter, and clean it effectively. By the end, you’ll be equipped with the knowledge and confidence to maintain a clean and efficient filter for your outside oil tank.
To successfully prepare for cleaning the filter on an outside oil tank, follow these steps:
Step 1: Preparation
1. Gather the necessary tools and equipment: Before beginning the preparation process, ensure you have the required tools and equipment such as gloves, safety goggles, a wrench, a bucket, and any other specific items mentioned in the guide.
2. Ensure safety precautions: Put on your safety goggles and gloves to protect yourself from any potential hazards during the cleaning process.
3. Locate the oil tank: Identify the location of the outside oil tank on your property. This will determine how you access and prepare to clean the filter.
4. Clear the area: Remove any objects or debris that may obstruct access to the oil tank, ensuring a clear and safe working space.
5. Turn off the power supply: If applicable, shut off the power supply connected to the oil tank to prevent any accidents or interruptions during the cleaning process.
By following these steps, you will be well-prepared to proceed with the subsequent steps of cleaning the filter on your outside oil tank. Remember to always prioritise safety and adhere to any additional tips and safety precautions provided in the guide.
When cleaning the filter on an outside oil tank, it is important to follow the necessary steps to ensure safety and efficiency.
To begin the process, it is crucial to shut off the oil supply to the tank. This will prevent any oil from flowing while the filter is being cleaned, reducing the risk of spills or accidents.
Locate the oil supply valve, typically found near the tank or on the fuel line, and turn it off. Ensure that the valve is fully closed to stop the flow of oil.
By following Step 2: Shutting Off the Oil Supply during the filter cleaning process, you can minimise the risk of oil leakage and ensure a safer environment for maintenance.
To locate the filter on an outside oil tank, follow these steps:
1. Ensure the oil tank is accessible and visible.
2. Look for a small access panel or door on the side or top of the tank.
3. Inspect the tank for any labels or markings that indicate the location of the filter. This step is crucial in locating the filter.
4. If there are no labels, use a flashlight to search for a cylindrical or rectangular shape attached to the tank.
5. Check the area near the oil supply line, as the filter is often installed in close proximity. This is another important step in locating the filter.
6. If you are unable to locate the filter visually, consult the owner’s manual or contact a professional for assistance.
Locating the filter is an essential step in cleaning an outside oil tank. It allows you to access and remove the filter for cleaning or replacement, ensuring that the oil flowing into the tank remains free from debris or impurities.
By keeping the filter clean, you can maintain the efficiency and longevity of your oil tank system.
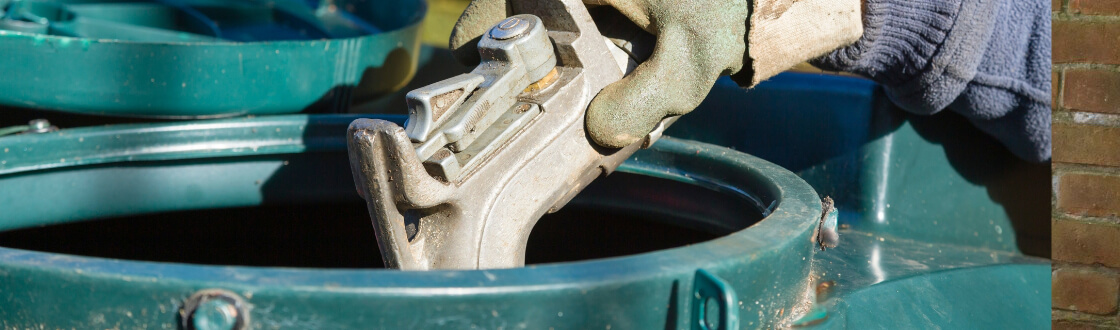
When it comes to removing the filter on an outside oil tank, following the proper steps is crucial for a successful cleaning process. Here is a step-by-step guide on how to remove the filter:
1. Ensure safety: Before starting the process, make sure to wear appropriate protective gear, such as gloves and eye goggles, to avoid any potential injuries.
2. Locate the filter: Identify the location of the filter on the outside oil tank. It is usually situated near the oil supply line.
3. Prepare tools: Gather the necessary tools for removing the filter, including a wrench or a filter removal tool.
Step 4: Turn off the oil supply: Before removing the filter, shut off the oil supply by closing the valve or switch that controls the flow of oil.
5. Detach the filter: Use the wrench or filter removal tool to carefully loosen and remove the filter from its housing. Take note of any spills and clean them immediately.
6. Inspect the filter: Examine the removed filter for any signs of damage or excessive buildup. If necessary, replace it with a new one.
7. Dispose of the filter properly: Dispose of the used filter according to local regulations and guidelines. Consider recycling options if available.
By following these steps, you can safely and effectively remove the filter from your outside oil tank as part of the cleaning process.
Step 5: Cleaning the Filter
Prior to reinstalling the filter into the oil tank, it is essential to ensure that it is completely clean. Even small amounts of dirt or debris can have an impact on the efficiency of the filter and potentially lead to problems with the oil tank.
Suggestions:
– Take your time and be meticulous when cleaning the filter to ensure its proper functionality.
– Use appropriate cleaning agents and tools to effectively remove dirt and debris.
– Regularly clean the filter to maintain its effectiveness in filtering the oil.
– Follow the manufacturer’s instructions for cleaning and maintenance to ensure optimal performance of the filter.
When reinstalling the filter on an outside oil tank, it is important to follow these steps for a successful installation. Firstly, make sure that the filter is clean and free from any debris. Then, align the filter with the designated slot on the oil tank.
Once aligned, firmly push the filter into place, ensuring that it is securely seated. Take the time to check for any signs of leaks or loose connections around the filter. If everything looks secure, proceed to tighten any fittings or clamps to ensure a proper seal.
After completing these steps, it is time to turn on the oil supply and carefully observe for any leaks or abnormalities in the oil flow. By following these steps, you can be confident that the filter is properly installed, allowing for efficient and effective filtration of the oil in the tank.
Let’s take a look at a real-life example of someone who benefited from following these steps. John, a homeowner, recently learned about the importance of cleaning and reinstalling the filter on his outside oil tank. Determined to take matters into his own hands, he decided to follow the step-by-step guide provided.
With patience and careful attention to detail, John successfully cleaned and reinstalled the filter. As a result, he noticed a significant improvement in the performance of his oil tank.
The filter was now able to effectively remove any impurities from the oil, ensuring its proper functioning. John is grateful for the guidance and confidence in his ability to maintain his oil tank going forward.
Step 7: Turning On the Oil Supply
Here are some additional tips and safety precautions to keep in mind when cleaning the filter on an outside oil tank:
– Inspect the tank regularly for any signs of damage or leaks.
– Before starting the cleaning process, ensure that the tank is turned off and the power source is disconnected.
– Use proper safety gear, including gloves and goggles, to protect yourself from any chemicals or debris.
– Follow the manufacturer’s instructions for cleaning the filter and use the recommended cleaning agents.
– If the filter is clogged, remove it and clean it thoroughly using a brush and clean water. Avoid using any abrasive materials that could damage the filter.
– Once the filter is clean, ensure that it is dry before reinstallation.
– Check the gaskets and seals on the tank to ensure they are in good condition. Replace any damaged or worn-out parts.
– Regularly monitor the filter for any signs of clogging or damage. Clean or replace it as needed.
– Dispose of any waste materials or cleaning agents properly, following local regulations and guidelines.
– If you encounter any difficulties or are unsure about the cleaning process, consult a professional for assistance.
[catlist name=”blog”]
To clean the filter on an outside oil tank, follow these steps:
Cleaning the filter on an outside oil tank should be done at least once a year. However, if the heating system is used frequently or if you notice signs of reduced heating performance, increased energy bills, or equipment failure, it may need to be cleaned more frequently. Regular maintenance is essential to keep the heating system running efficiently.
To clean the filter on an outside oil tank, you will need the following tools and materials:
When cleaning the filter on an outside oil tank, it is important to take the following safety precautions:
The signs that the filter on an outside oil tank needs cleaning include:
You can clean the filter on an outside oil tank yourself if you have the necessary tools and knowledge. However, if you are unsure or uncomfortable with the process, it is recommended to seek expert help from a qualified technician or heating supply store. They can provide guidance and assistance to ensure the filter is cleaned properly.
We Aim To Reply To All Enquiries With-in 24-Hours